ConceptDraw V offers a variety of ways of working with shapes. You can change shape properties, assign text and hyperlinks, rotate and resize shapes and many more.
Selecting
Copying and Pasting
Duplicating
Moving
Rotating and Flipping
Resizing
Reshaping
Changing the Front-to-Back Order
Distributing Shapes
Aligning Shapes
The Join, Combine and Separate Operations
Grouping and Ungrouping
Substituting a Shape with another Shape
Copying Shape's Visual Attributes
Deleting
Undo and Redo
Selecting a Shape
Selecting Multiple Shapes
Primary and Secondary Selection
Selecting Shapes Inside a Group
Selecting Shapes in the Order they were Created
Selecting a Shape
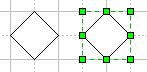
To work with a shape, you need to select it. Selected shapes are surrounded by a dashed green or blue line which shows the shape's alignment box.
In most cases, the Select mode is used for selecting shapes. To switch to the Select mode, use any of the following ways:
a) click on the Select button  on the toolbar,
b) choose Select in the Tools menu,
c) or use the keyboard:
 Ctrl + 1 Ctrl + 1 |
 Ctrl + 1 Ctrl + 1 |
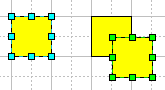
To select a shape, just click it with the mouse.
When you select a shape, it also shows handles which you can
drag to modify some properties of the shape.
Handles vary with the type of the shape and the tool which is currently active
on the toolbar. Here you can see how an ellipse looks if selected in different
tool modes: Select, Line, Arc.

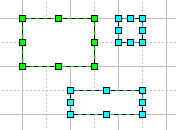
Multiple Selection
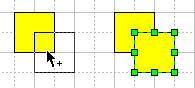
To select several shapes at a time, click them one by one, holding down the Shift key. To deselect one of the selected shapes, hold down Shift and click this shape again (this can be done for Select Box as well, see below).
In the Select
or Rotate  tool modes, you can also use Select Box
for selecting multiple shapes. Click the mouse beyond all the shapes you want
to select, and while holding down the mouse button, drag it across the shapes
to embrace them with a box. All the shapes touched by the resulting thin-line
box will appear selected.
tool modes, you can also use Select Box
for selecting multiple shapes. Click the mouse beyond all the shapes you want
to select, and while holding down the mouse button, drag it across the shapes
to embrace them with a box. All the shapes touched by the resulting thin-line
box will appear selected.

To select all the shapes on the page, choose Select All from the Edit menu.
| Ctrl + A |
Cmd + A |
The Select Connected command from the Edit menu allows to select all shapes, connected to the currently selected shape with connectors.
To cancel the selection, click outside the selected shapes.
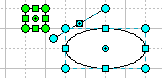
Primary and Secondary Selection
When several shapes are selected, one of them displays green handles: this is the primary selected shape. All the other selected shapes show blue handles: they are secondary selected shapes.
Some operations distinguish between the primary shape and the secondary selected shapes. They use the primary shape as a model for other shapes (Align, Distribute, etc). Other operations such as Information, Hyperlink, Connection Point, work with the primary shape only, and ignore the rest.
You can reassign the primary shape - click another selected shape to make it
primary (it will display green handles).
Selecting Shapes Inside a Group
It's also possible to select shapes that are part of a group.
To do this, select the group first and then click on a shape inside the group to select that shape. If the group contains other groups you may need to click a few times until you select the desired shape.
For more comfortable editing (moving, rotating, reshaping, adding or deleting elements), you can use the group editing window. Use the Edit Group command under the Shape menu. The group will be opened in a separate window, where you can edit it as if it were ungrouped.
Selecting Shapes in the Order they were Created
You can also use the Tab key to select shapes. Each time you hit Tab, you select shapes in the order in which they were created or dropped on the page, starting from the currently selected shape. The program will adjust the document page each time you press Tab, so that the selected shape is shown in the center of the screen. If no shape is selected, hitting Tab will select the first shape you have drawn or dropped on the page.
You can also use the Select Next command under the Edit menu with the same result.
Holding down the Shift key when hitting Tab reverses the selection order - so does Select Previous under the Edit menu.
You can exchange information between ConceptDraw and other applications by using the Clipboard. The Clipboard is a temporary storage area used by the system to transfer data between documents and applications. By using the Cut, Copy and Paste commands, you can copy the selected text or shapes onto the Clipboard and then insert it to another location.
Cut and Copy
The Copy command creates a copy of the selected shapes or
text and places it onto the Clipboard.
Use Copy tool  on the toolbar, or select Copy from the Edit
menu.
on the toolbar, or select Copy from the Edit
menu.
| Ctrl + C Ctrl + Ins |
Cmd + C |
Once there is some data on the Clipboard, it can be inserted into the same document, or other documents and applications.
The Cut command combines two operations: Copy
and Delete. It places the selected items on the Clipboard,
and then deletes them from the document. To use this command, choose Cut
from the Edit menu, or click the Cut button
 on the toolbar.
| Ctrl + X Shift + Del |
Cmd + X |
Note: On the Macintosh platform, ConceptDraw
uses the PICT format to exchange data with other applications.
Paste
The Paste command inserts the content of the Clipboard into
the cursor position. To perform the command, select Paste from
the Edit menu, or use the Paste tool  on the toolbar.
| Ctrl + V Shift + Ins |
Cmd + V |
Note:
If you paste an object created in another OLE-compatible
application, it will be inserted as an OLE Object.
In the Mac
version, if the Clipboard contains text, it will be inserted into the shape
with primary selection (the one displaying green handles). When none of the
shapes are selected, a "Text" shape will be created and the text
will be pasted into it.
"Paste Special..."
You can use the Paste Special command to choose in what form
the content of the Clipboard will be inserted into your ConceptDraw document
(picture, text, etc.).
You can perform the Paste Special command from the Edit
menu or use the keyboard:
| Ctrl + Alt + V |
Cmd + Opt + V |
"Paste in Place"
If there is a ConceptDraw shape on the Clipboard, the Paste in Place command lets you paste the content of the Clipboard into the same relative position on a page as that from where the original shape was copied or cut.
You can call the Paste in Place command from the Edit menu or use the keyboard:
| Ctrl + Shift + V |
Cmd + Shift + V |
This operation is particularly useful when you need to copy or move a shape into another document (or onto another page) so that it's placed in the same position on the page as the original shape.
Note: For pasting objects from other applications,
this command works just the same way as the Paste command.
To duplicate the selected shape(s), select Duplicate from the Edit menu.
| Ctrl + D |
Cmd + D |
The first copy will appear slightly below and to the right from the original shape.
The Duplicate operation allows to create multiple copies and position them with the desired offset. This is convenient for drawing for instance, a fence - when the distance between each next and previous element is always equal. To create multiple copies with the same offset, perform the duplicate operation once, and move the first copy to the needed position. Each subsequent copy will appear at the same relative distance, as the first copy to the original shape. This way you can quickly and accurately create drawings with many repeating elements.
Another option is to duplicate shapes by using the mouse. You may find it more convenient, as it lets you create a copy and move it to a desired location at the same time. Hold down the Ctrl (in Windows) or Option (in Mac OS) key and drag a copy out of the selected shape to the place where you want to position it.
Note 1: To copy the shapes to another document, use the Copy/Paste operations.
Note 2: Alternatively, you can duplicate shapes by using the Stamp Tool. If there is no shape selected in the library, this tool will clone the selected shape(s) in the document. See the Libraries - Using Libraries and Library Shapes section for details.